Introduction:
LED floodlights have become popular for outdoor illumination due to their energy efficiency, longevity, and brightness. However, LED floodlights may encounter issues over time, like any electronic device. Instead of immediately replacing a malfunctioning unit, attempting a repair is often cost-effective and environmentally friendly. But how to repair LED flood lights? In this comprehensive guide, we’ll explore common problems with LED flood lights and provide step-by-step instructions on how to repair them.
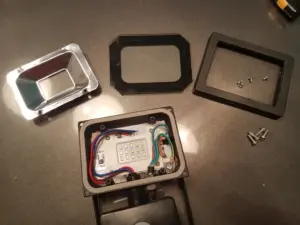
Understanding LED Flood Light Components
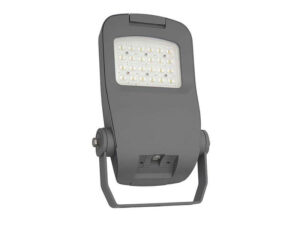
Before answering the question of how to repair LED flood light, it’s essential to have a basic understanding of the components that make up an LED flood light. Typical components include:
- LED Chips: The actual light-emitting diodes that produce illumination.
- Driver/Power Supply: Converts incoming electrical power to the appropriate voltage and current for the LEDs.
- Heat Sink: Helps dissipate heat generated by the LEDs, preventing overheating.
- Lens or Cover: Protects the LEDs and helps direct the light.
- Housing: Provides structural support and protection for internal components.
Common Issues and Troubleshooting
No Power/No Light Output
Check the Power Source: Ensure the flood light is connected to a working power source before starting on LED flood light repair. Test the outlet with another device to confirm power availability.
Inspect the Power Cord: Check for any visible damage or loose connections in the power cord. Replace if necessary.
Dim or Flickering Light
Driver Issues: Dimming or flickering may indicate a problem with the driver in most outdoor LED flood lights. Test the driver with a multimeter to ensure it’s providing a consistent output. Replace the driver if faulty.
Uneven Lighting or Dark Spots
Inspect LED Chips: Dark spots or uneven lighting can result from a malfunctioning LED chip. Check each chip for visible damage or discoloration. Replace any faulty LEDs.
Overheating
Check the Heat Sink: Overheating can occur if the heat sink is not effectively dissipating heat in an outdoor LED flood lights setup. Clean the heat sink from dust and debris, ensuring proper ventilation. Consider adding additional cooling if necessary.
Water Damage
Seal Check: LED flood lights are designed to be weather-resistant, but exposure to extreme conditions can lead to water damage. Check the seals and gaskets for any signs of wear or damage. Seal any gaps or replace damaged seals.
Step-by-Step LED Flood Light Repair Guide
Below is the step-by-step guide on how to repair LED flood lights:
1. Safety First
Before starting any repair on outdoor LED flood lights, ensure the LED flood light is disconnected from the power source. This eliminates the risk of electrical shock during the repair process.
2. Visual Inspection
Examine the entire unit for visible damage, loose connections, or burnt areas. Pay special attention to the power cord, LED chips, and driver.
3. Check Power Source
Test the power outlet with another device to confirm it is working. If the outlet is functional, connect the LED flood light to another outlet to rule out power source issues because this is the general cause of problems in most outdoor LED flood lights.
4. Inspect Power Cord
Check the power cord for visible damage, fraying, or loose connections. If there is any of the above situations, replace it with a new one of the same specifications.
5. Test the Driver
Use a multimeter to test the output of the driver. If the driver is not providing a consistent output, replace it with a compatible driver.
6. Examine LED Chips
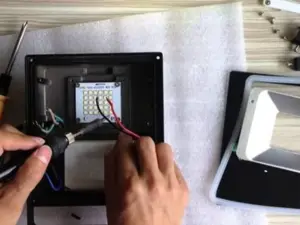
Inspect each outdoor LED flood light chip for visible damage, discoloration, or irregularities. Replace any faulty LED chips with compatible replacements.
7. Clean Heat Sink
Remove dust and debris from the heat sink using compressed air or a soft brush. Ensure no obstructions are blocking proper ventilation.
8. Address Water Damage
Check the seals and gaskets for any signs of wear or damage. Seal any gaps with silicone sealant or replace damaged seals.
9. Reassemble and Test
Carefully reassemble the LED flood light, ensuring all components are securely in place. Reconnect the light to the power source and test its functionality.
10. Consider Professional Help
If the issue persists or you are uncomfortable with the outdoor LED floodlight repair process, consider seeking professional assistance. Professional technicians can diagnose and repair more complex issues.
Prevention Tips for Long-Term LED Flood Light Health
While repairs are essential when issues arise, taking preventive measures can prolong the life of your LED flood lights:
- Regular Cleaning: Remove dirt and debris from the lens and heat sink regularly to maintain optimal performance.
- Weatherproofing: Ensure that seals and gaskets are intact to protect the internal components from water damage.
- Proper Ventilation: Avoid blocking the heat sink, allowing for efficient heat dissipation.
- Timely Repairs: Address minor issues promptly to prevent them from escalating into more significant problems.
- Quality Components: Invest in high-quality LED flood lights with durable components for better longevity.
By following this comprehensive guide, you can troubleshoot and repair common issues with LED flood lights, potentially saving both money and resources. Regular maintenance and timely repairs will not only keep your outdoor spaces well-lit but also contribute to a more sustainable and eco-friendly approach to lighting solutions.
FAQs of How To Repair LED Flood Lights?
What are the common issues that can occur with LED flood lights?
LED flood lights may experience issues such as no power or light output, dim or flickering light, uneven lighting, overheating, and water damage. These problems can affect the overall performance of the light and require specific troubleshooting steps.
How to repair LED flood light that is not working?
Begin by conducting a visual inspection for visible damage, check the power source and cord, test the driver with a multimeter, inspect the LED chips for damage, clean the heat sink, and address any water damage. The step-by-step repair guide in the article provides detailed instructions for each of these troubleshooting steps.
Can I repair an LED flood light myself, or should I seek professional help?
Many common issues with LED flood lights can be addressed through DIY repairs. The article provides a comprehensive step-by-step guide for troubleshooting and repairing various issues. However, if the problem persists or if you are uncomfortable with the repair process, it is advisable to seek professional assistance to diagnose and fix more complex issues.
How often should I perform maintenance on my LED flood lights?
Regular maintenance is crucial for the long-term health of LED flood lights. It is recommended to clean the lens and heat sink regularly, check for proper ventilation, and inspect seals and gaskets for wear or damage. Timely repairs of minor issues can prevent normal led flood light repair work to escalating into more significant problems.
What preventive measures can I take to ensure the longevity of my LED flood lights?
To prolong the life of LED flood lights, consider regular cleaning, weatherproofing to protect against water damage, ensuring proper ventilation for the heat sink, and investing in high-quality lights with durable components. These preventive measures contribute to the overall sustainability and eco-friendliness of your outdoor lighting solutions.